Home > Steve > Go > Problem of the month
In the Summer 2000 issue of the British Go Journal, I presented an article "Back to basics" based on the six point corner. The following two problems were not part of that article, but do show that things may not always be straightforward.


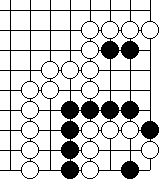
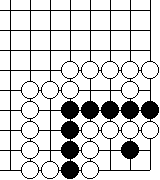
In both these positions, answer a status question in two phases.
Firstly, what is the status of the white group in the corner making the rash assumption that the black group surrounding it is solidly alive?
Secondly, and more pertinently, what is the status in the diagrams as shown?
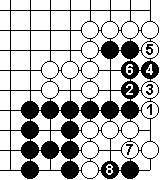
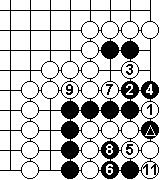
Then White is dead. Dia 3 shows one attempt by White to live, but none work.
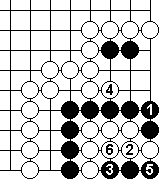
Black can kill, he is comfortably ahead on liberties. After White 6
White has 3 liberties to Black's 7.
Black even has the time to play 5' to connect the other two Black stones
to his main group and he still wins the liberty race (3 all with Black
to play), though this is not shown.
If White connects his 2-1 stone at the 2-2 point, Black connects his 3-1 stone at the 4-1 point and the sequence effectively reverts to Dia 4. White's only hope is to capture at the 4-1 point.
My initial thought on attempting to analyse this problem, which was "invented" at West Surrey Go Club and so has no professional answer, was that White could easily manage life. In a previous version of this problem, Black had one fewer liberties and that seemed to make it too easy for White, hence Black grew a liberty. Further analyse found several ways for Black to foil White, and the answers went to White just scraping life, then to White living in ko, then to White dying whatever and I'm back to White living in a highly unfavourable ko!
I await your comments...
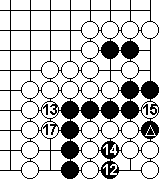
10 at ![]() , 16 ko
threat elsewhere, 18 at
, 16 ko
threat elsewhere, 18 at ![]() .
.
To win this fight, White has to ignore a total of 4 Black ko threats and find three ko threats which get answered!
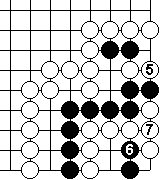
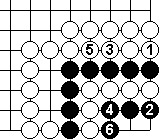
If White plays 5 on the outside, Dia 7, then Black 6 at the 2-2 point kills White. White has a gun nakade with two black stones, worth 8-2 = 6 liberties while Black has 6 liberties. It is Black to play, so White dies.
If White connects by playing 5' at 7, then he has 8-1 = 7 liberties to Black's 7, again Black is to play, so he still dies.
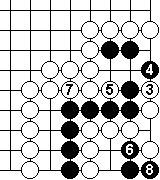
A key tactic that Black uses to win in many of the paths that proved to be non-optimal later was not to capture White 1 & 3 until he had ataried at the 1-1 point as well, this causes White insuperable problems.
Note that Black 2 is better than the hane, White 3' would then cut for a regular ko for life.
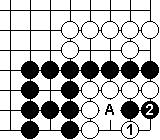
White is dead. He needs to play 3' at A to split the territory into two parts, but A is self-atari.
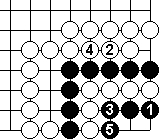
As shown here, White is way behind on liberties.
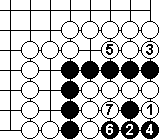
This is a weird situation where playing inside your 'own' territory actually increases your liberties.
It works becasue it makes the gun nakade shape (worth 8 liberties less one for the black stone already in place) whilst preventing Black making an eye at the 1-1 point.
If Black plays as Dia 12, he loses the race by one liberty. (After White 7, Black has 4 liberties to White's nakade 5.)
So Black must find something better.
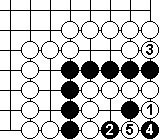
Black 2 in Dia 13 leads to a ko.
White plays 3 on the outside to remove a liberty, preventing Black 4' at 5 working whilst avoiding playing at 5 which would mean finding the first ko threat.
Home >
Steve >
Go >
Problem of the month
British Go Association
Last updated 2004-08-10
This page is part of http://www.stocton.org/
Email: webmaster@stocton.org